First Chapter
简介
Apple提供获取视差图的API
- iPhone怎样获取图片的深度信息
- 从图片中读取深度信息
- 对深度信息运用滤波器创建惊艳的效果
iPhone怎样获取图片的深度信息
iphone的双摄像头可以模仿立体视觉
距离人的眼睛近的物体,相对于背景的位置变大
iphone的双摄像头就像人的眼睛一样,看到两张图片,计算这两张图片移动了多少像素,像素的改变叫做视差,Disparity
从图片中读取视差数据
struct DepthReader {

  var name: String  //图片名字
  var ext: String   //图片扩展名

  //获取图片深度信息的方法
  func depthDataMap() -> CVPixelBuffer? {
    guard let fileURL = Bundle.main.url(forResource: name, withExtension: ext) as CFURL? else {
      return nil
    }

    guard let source = CGImageSourceCreateWithURL(fileURL, nil) else {
      return nil
    }
    //从图片中获取包含视差数据的辅助数据
    guard let auxDatainfo = CGImageSourceCopyAuxiliaryDataInfoAtIndex(source, 0, kCGImageAuxiliaryDataTypeDisparity) as? [AnyHashable : Any] else {
      return nil
    }

    var depthData: AVDepthData

    //从辅助数据中获取视差数据
    do {
      depthData = try AVDepthData(fromDictionaryRepresentation: auxDatainfo)
    } catch {
      return nil
    }

    //确保深度数据的格式为 32-bit floating point disparity information
    if depthData.depthDataType != kCVPixelFormatType_DisparityFloat32 {
      depthData = depthData.converting(toDepthDataType: kCVPixelFormatType_DisparityFloat32)
    }

    return depthData.depthDataMap
  }
}
把视差数据转化为图片
func loadCurrent(image name: String, withExtension ext: String) {

    let depthReader = DepthReader(name: name, ext: ext)

    //获取图片的深度数据
    let depthDataMap = depthReader.depthDataMap()

    //单位化深度数据,使深度数据在0和1之间  0: 代表距离最远的数据 1:距离最近的数据
    depthDataMap?.normalize()

    let ciImage = CIImage(cvPixelBuffer: depthDataMap)
    depthDataMapImage = UIImage(ciImage: ciImage)

    // Create the original unmodified image
    origImage = UIImage(named: "\(name).\(ext)")
    filterImage = CIImage(image: origImage)

    // Set the segmented control to point to the original image
    imageModeControl.selectedSegmentIndex = ImageMode.original.rawValue

    // Update the image view
    updateImageView()
  }
Depth vs Disparity 深度和像素差距

对象越远,depth越大,像素之间的距离越近越接近于0
转化深度数据到Image mask

depth map image的pixel value 等于单位化的Disparity
pixel value1.0是白色的 ,Disparity为1.0距离摄像头最近
pixel value 0 黑色的,Disparity为0,距离摄像头远
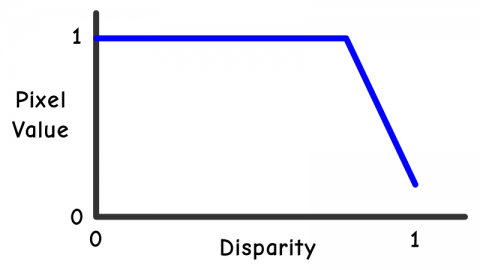
当根据深度数据创建mask之后,需要改变该函数做一些有趣的事
sing a slope of 4.0, a width of 0.1, and 0.75 as the focal point

最白的地方在视差数据0.75 +- 0.5的地方,然后将随着视差数据的变大而快速变暗
对depthImage用如下函数的滤波器
func createMask(for depthImage: CIImage, withFocus focus: CGFloat, andScale scale: CGFloat) -> CIImage {

    let s1 = MaskParams.slope
    let s2 = -MaskParams.slope
    let filterWidth = 2 / MaskParams.slope + MaskParams.width
    let b1 = -s1 * (focus - filterWidth / 2)
    let b2 = -s2 * (focus + filterWidth / 2)

    //用s1去乘所有的像素值,mask image为灰度图像,因此需要确保所有的颜色通道有着相同的值
    //用CIColorClamp使得所有值在0和1之间
    let mask0 = depthImage
      .applyingFilter("CIColorMatrix", parameters: [
        "inputRVector": CIVector(x: s1, y: 0, z: 0, w: 0),
        "inputGVector": CIVector(x: 0, y: s1, z: 0, w: 0),
        "inputBVector": CIVector(x: 0, y: 0, z: s1, w: 0),
        "inputBiasVector": CIVector(x: b1, y: b1, z: b1, w: 0)])
      .applyingFilter("CIColorClamp")


    let mask1 = depthImage
  .applyingFilter("CIColorMatrix", parameters: [
    "inputRVector": CIVector(x: s2, y: 0, z: 0, w: 0),
    "inputGVector": CIVector(x: 0, y: s2, z: 0, w: 0),
    "inputBVector": CIVector(x: 0, y: 0, z: s2, w: 0),
    "inputBiasVector": CIVector(x: b2, y: b2, z: b2, w: 0)])
  .applyingFilter("CIColorClamp")

    return depthImage
  }

s1越大,坡越陡,常数b1向左或右移动
mask1函数 s2是负值
创建一个聚光灯滤波器
REF:
https://www.raywenderlich.com/168312/image-depth-maps-tutorial-ios-getting-started